
Today I am sharing a pattern to knit a small donkey softee.
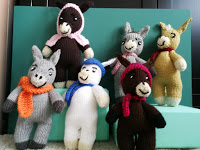
I have been volunteering at the local donkey sanctuary, and making things for the gift shop. There are several good patterns for making crochet donkeys available, and I have made many of those. I wanted to switch up my crafts a bit and knit for a while but could not find a nice knit pattern, so I decided to make my own easy pattern for a knit donkey. I share it here with you, in case you would like to make one as well! If you are very enthusiastic, you can make some to donate to your donkey sanctuary as well. This is the one that I donate to Donkey Sanctuary of Canada. The address is listed there under the contact information, and if you mail them, you can send it in care of the gift shop.
Great new! The pattern is now available as a free pdf here: https://www.yarncanada.ca/content/DonnasCreationsSmallKnitDonkeyPattern.pdf
This should make it much easier for you to follow the pattern to make your own little donkey! Thanks to Yarn Canada for converting the pattern to this format!
Small Knit Donkey
Finished size about 22 cm from bottom of foot to top of head.
Gauge is not important for this toy as long as it makes a tight fabric so the stuffing does not show.

Materials:
3 ¾ mm needles
about 40 gm worsted weight yarn in main colour
small amount of contrasting yarn for hoof colour
smaller amount of contrasting B for muzzle
small amount of black yarn for embroidery of face ( safety eyes if you prefer, I always embroider eyes)
Body and head
With hoof colour, cast on 8 st.
knit front and back – 16 st
Work 2.5 cm in st st for hoof.
Switch to main body colour, leave long tails of yarn for sewing seams later.
Continue working in st st until work measures 6 to 7 cm from cast on to live stitches, ending with a purl row.
Put these stitiches on spare yarn or a stitch holder and make the second leg to match. Do not cut yarn.
End with a purl row.
K1 m1, k14, m1, k1. Transfer stitches from holder to needle ready to be knit and joined to second leg. K1, m1, k14, m1 k1. Both legs are now joined and you are ready to work on the body. – 36 st
Work 7 ½ cm of body in st st. (total length about 15 cm from hoof to needle)
Decrease for shoulder area: on the next knit row, (k6, k2tog) x2, k4, (k2tog, k6) x2 -32 st
purl
(k5, k2 tog) x 2, k4, (k2tog, k5) x2 -28 st
Purl
(k4, k2tog) x2, k4, (k2tog, k4) x2 – 24 st
purl row, knit row, purl row
head
(k4, m1) 5 times. Knit to end. 29 st
work in st st for about 7 ½ cm from neck decreases (if using safety eyes, put them in about 4 cm from neck)
(k4 k2tog) to last 5 st. k3 k2tog – 24 st
purl
(k3, k2tog) to last 4 st, k2, k2tog -19 st
purl
(k2,k2tog) to last 3 st, k1, k2tog – 14 st
purl
k2tog across row. Cut yarn. Using darning needle, thread thru rem 7 st and pull tight. Secure. Leave a long tail for sewing seam at back of head.
I like to sew as I go so it is not such a long process at the end.
Using the tail from the head, sew the seam on the back of the head to the neck and secure the yarn. Again, do not cut the tail.
Sew the inseams of the legs, using the appropriate yarn tail colour. Secure at the top of the legs, then sew about half way up the back going towards the neck. Stuff lightly. If you put too much stuffing in, it will pull the knit fabric so you can see the stuffing, so, stuff lightly! Once the legs, head, and body have been stuffed, close the seam all the way to the neck. Using body coloured yarn, secure a length of yarn at the neck on the back of the toy. Make a running stitch around the neck, then pull slightly to define the neck. Secure the yarn, then wind the tail around the neck over the gathering stitches and pull a little tighter. Secure the yarn, hide all yarn tails on the body and head now.
Front legs (arms)
Using hoof colour, cast on 7 st.
knit front and back across – 14 st.
Work about 2 ½ cm in st st for hoof. Cut yarn, leave tail.
Join on body colour and continue to work in st st until leg measures 7 ½ cm total length.
K2 tog to end. Cut yarn, leaving tail. Thread yarn thru remaining stitches and pull tight. Secure. Continue to sew seam leaving a small opening to stuff lightly. After stuffing, finish closing the seam and hide ends.
Make a second leg to match.
The front legs can either be sewn on securely at the shoulder, or if you want to have arms that can move, Thread a long length of yarn on a darning needle. Go thru one leg, into the body, and continue through the opposite leg. Do not pull the tail all the way thru! Take a small stitch on the leg you just secured and go all the way through the leg, body and opposite leg again. Tie a knot using the tail of the yarn where you started. Pull gently, do not pull too hard or you will pull the legs too far into the body. Repeat this process 2 or 3 more times, making sure your stitches go in and out about the same stitch. The arms should now be able to “swing”. Hide the yarn ends.

Sewn on legs on left, swivel legs on right.

White donkey, front legs sewn on, do not move. Beige donkey, swivel arms can be rotated to pose.
Muzzle
Using body colour, cast on 16 st. Work 4 rows in st st.
Switch to muzzle colour and work another 4 rows in st st.
Decrease for front of muzzle
k2 tog, k2 across row.
Purl
k2tog across row.
Cut yarn. Thread tail thru darning needle and go thru stitches and pull tight. Secure yarn end.
Stuff muzzle lightly and place on lower part of head, above neck. (I use a knitting needle to hold it in place until secured)
Use the yarn tail to secure the muzzle to the face.
You can now embroider the eyes, nose and mouth.
Tail – cut 3 lengths of yarn (body colour or contrast if you like) about 15 cm long. Bring these thru a stitch on the rear of the donkey in the centre, a few cm above the legs. Half the length should be on each side of the stitch. Make 3 2-strand lengths and braid a tail. Make it longer than the finished tail will be … then tie a knot at the end of the tail to keep the braid from unravelling, and cut the yarn ends to make a small tuft.
Mane
Cut smaller lengths of yarn and tie them from the forehead to the top of the neck, down the back of the donkey. Donkey mains are not long like horses, but shorter and not as thick. Trim the yarn when you are finished.If you crochet, you can also crochet a mane onto the donkey. Attach yarn to a stitch on the forehead, chain 3, insert hook in a stitch behind the first, make a slst, then cr 3 st. Repeat along the back of the neck. Secure yarn and hide yarn ends.


Last step …. those adorable donkey ears!
Cast on 12 st in main body colour. Work 10 rows in st st.
Decrease …. (k2, k2 tog) across row 9 st
st st 3 rows.
k2tog, k1 across row 6 st
purl
k2tog across. Cut yarn leaving long tail. Gather the 3 st and pull tight, sew side seam of ear. Secure at the bottom. Secure ear to the top of the head. Hide yarn ends.
Make 2nd ear to match.
You now have a sweet little donkey softee!
